This guide is a quick-start overview of the XRHealth Professional Platform. It covers the most important actions you need to know to get up and running — from launching a VR session to casting the patient's view, viewing reports, and managing patient information. For each topic, you'll find links to dedicated articles with more in-depth guidance.
By the end of this guide, you'll be able to launch a VR environment, cast the patient's view, view reports, and perform basic platform operations with confidence.
To watch the video tutorial click here
Getting Started
- Go to platform.xr.health
- Enter your clinician email address in the Email field
- Click Send login code
- Check your email and enter the verification code
- Click Verify code
Basic Platform Structure
The XRHealth Professional Platform is organized into organizations, which include:
- Clinicians
- Patients
- Devices
Visibility types are separated into two tabs:
- Organization – Visible to all clinicians in your organization
- Personal – Visible only to you
How to Launch a VR Environment
Note: Please make sure only one browser window or tab with the platform is open at a time, to ensure the system works properly.
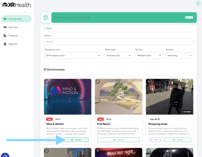
- Go to the Homepage
- Select an environment — explore the different spaces and categories
- Click "Launch"
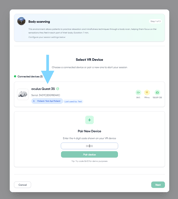
- Select the VR device. If the device is not listed: type the pairing code that appears on the XRPortal home screen to add it. Note: For the device to appear online, it must be connected to Wi-Fi and inside the XR Portal app (not on the Launcher screen).
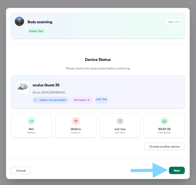
- Confirm the device is ready for use, then click "Next"
- Optionally update the Session Title and Description, then click "Next"
Note: The session will automatically be assigned to the patient linked to the headset. If the headset is not assigned to any patient, you can select the patient here.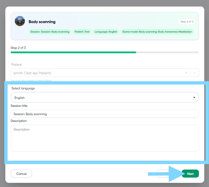
- Select the Control Mode and click "Start Session"
Note: Not all environments allow both modes. In that case, you won't see the screen, and the environment will start in the available mode it has.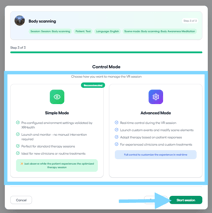
-
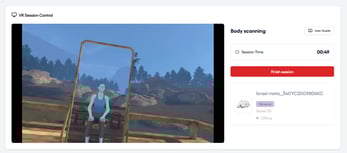
Simple Mode:
- Watch the patient's screen and guide them through the session
- Click "Finish" to end the session
-
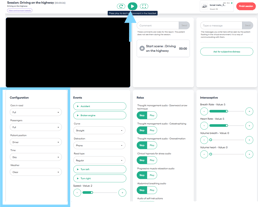
Advanced Mode:
- Set configurations
- Click the Play icon to start the session
-
Simple Mode:
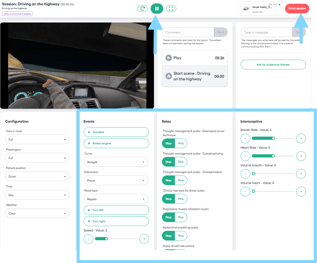
- During the session you can:
- Control variables
- Pause and resume with the Play/Pause icon
- Add notes
- Send messages to VR
- Finish the session
Tip: You can share these instructions with your patient to help them connect to Wi-Fi and understand what they need to do for the remote session to go smoothly.
Casting
To see what your patient sees in VR, click the casting icon (1). It will open a pop-up window displaying the VR screen (2). You can resize the window.
Note that even after you end the session, the pop-up window will continue to show the patient's view until you stop the casting.
How to View Reports
After a session ends, a report will be generated with a summary of the session.
To view your reports, click the Reports tab.
You can switch between Organization and Personal views.
At the top of the page, you'll find a dashboard with summary statistics and charts that give you an overview of session activity — such as total sessions, session trends over time, and top environments. Scroll down to find reports for specific sessions.
For a full breakdown of the Reports tab and its features, refe to How to Use Reports.
Messages
The Messages tab allows you to communicate directly with your patients through the platform. You can initiate a conversation at any time, and incoming messages from your patients are automatically assigned to you.
For full details on how to use the messaging feature, refer to How to Use the Messages Inbox.
How to View and Edit Patient Information
Viewing Patient Information
- Go to the Patients tab — by default, it opens on the Actions needed view, which shows:
- Inactive patients — patients who haven't completed a session in the last 30 days
-
Pending activation — newly created patients who have never completed a session
- To see your active patient list, click Patients List in the left sidebar. Switch between Organization and Personal views at the top of the page
- Click on a patient's name to open their profile
- In the patient's profile, click the relevant tab:
- Reports — view session history and activity data
- Care Plan — view and manage the patient's personalized treatment program, including scheduled VR sessions designed to support their progress at home. For full details, refer to How to Configure and Manage the Care Plan
- Patient Info — view the patient's personal details
- My Devices — see the assigned headset and its information
-
Login Activity — view a 30-day history of the patient's logins to MyXRHealth, the patient app, including failed attempts and password changes
Editing Patient Details
- From the patient's profile, click Edit in the top right corner
- Make your changes and click Save Changes when done
Note: Changing the language will define the patient's headset language — its interface and content — as well as the patient's MyXRHealth web-interface language.